

一、前言
本文主要介绍部署Rsync服务并实现定时备份。
二、部署Rsync服务
2.1 服务端
1、检测是否安装
[root@harbor01 ~]# rpm -qa | grep rsync
rsync-3.1.2-12.el7_9.x86_64
如果没有,则通过以下命令进行下载
[root@harbor01 ~]# yum install -y rsync
2、编辑/etc/rsyncd.conf配置文件
[root@harbor01 ~]# cat /etc/rsyncd.conf
fake super =yes
uid = rsync
gid = rsync
use chroot = no
max connections = 2000
timeout = 600
pid file = /var/run/rsyncd.pid
lock file = /var/run/rsync.lock
log file = /var/log/rsyncd.log
ignore errors
read only = false
list = false
#hosts allow = 192.168.1.0/24
#hosts deny = 0.0.0.0/32
auth users = rsync_backup
secrets file = /etc/rsync.password
######################################
[backup]
comment = zq created
path = /backup
3、检查
检查进程
[root@harbor01 ~]# ps -ef |grep rsync
root       5667      1  0 20:46 ?        00:00:00 /usr/bin/rsync --daemon --no-detach
root       6160   3233  0 20:47 pts/0    00:00:00 grep --color=auto rsync
检查端口
[root@harbor01 ~]# ss -lntup |grep rsync
tcp    LISTEN     0      5         *:873                   *:*                   users:(("rsync",pid=5667,fd=3))
tcp    LISTEN     0      5      [::]:873                [::]:*                   users:(("rsync",pid=5667,fd=5))
4、添加虚拟用户
[root@harbor01 ~]# useradd -s /sbin/nologin -M rsync
如果执行不了,可以执行
[root@harbor01 ~]# sudo useradd -s /sbin/nologin -M -r rsync
5、创建密码文件
[root@harbor01 ~]# echo 'rsync_backup:111' >/etc/rsync.password
[root@harbor01 ~]# chmod 600 /etc/rsync.password
6、创建共享目录
[root@harbor01 ~]# mkdir /backup
[root@harbor01 ~]# chown -R rsync.rsync /backup/
7、启动服务
[root@harbor01 ~]# systemctl start rsyncd && systemctl enable rsyncd
8、本地测试
[root@harbor01 ~]# rsync -av /etc/hostname rsync_backup@192.168.1.67::backup
Password:111

[root@harbor01 ~]# ll /backup/
total 4
-rw-r--r-- 1 rsync rsync 9 Nov 16 18:12 hostname
2.2 客户端
1、检测是否安装
[root@nfs01 ~]# rpm -qa | grep rsync
rsync-3.1.2-12.el7_9.x86_64
如果没有,则通过以下命令进行下载
[root@nfs01 ~]# yum install -y rsync
2、客户端测试
[root@nfs01 ~]# rsync -av /etc/hosts rsync_backup@192.168.1.67::backup
Password:111
在服务端进行查看
[root@harbor01 ~]# ll /backup/
total 8
-rw-r--r-- 1 rsync rsync   6 Nov 17 19:02 hostname
-rw-r--r-- 1 rsync rsync 158 Jun  7  2013 hosts
当然也可以使用免密登录测试
#客户端操作
[root@nfs01 ~]# echo '111' >/etc/rsync.client
[root@nfs01 ~]# chmod 600 /etc/rsync.client
[root@nfs01 ~]# rsync -avz /etc/passwd rsync_backup@192.168.1.67::backup --password-file=/etc/rsync.client
sending incremental file list
passwd

sent 621 bytes  received 43 bytes  1,328.00 bytes/sec
total size is 1,244  speedup is 1.87

#服务端验证
[root@harbor01 ~]# ll /backup/
total 12
-rw-r--r-- 1 rsync rsync    6 Nov 17 19:02 hostname
-rw-r--r-- 1 rsync rsync  158 Jun  7  2013 hosts
-rw-r--r-- 1 rsync rsync 1244 Dec  3 20:58 passwd
三、全网备份
3.1 环境介绍
| 主机 | 角色 |
|---|---|
| harbor01 | 存放备份(服务端) |
| nfs01 | 生成备份(客户端) |
3.2 操作步骤
3.2.1 客户端备份脚本
1、创建存放备份脚本目录
[root@nfs01 ~]# mkdir /scripts
2、编写客户端备份脚本
[root@nfs01 ~]# cat  /scripts/client_bak.sh
#!/bin/bash
#author: zq
#desc: 系统备份脚本
#version: v1.0

#1、变量
ip=`hostname -I | awk '{print $1}'`
time=`date +%F_%w`
backup_dir=/backup/${ip}
backup_server=192.168.1.67
backup_file=conf-${time}.tar.gz

#2、备份
if [ ! -d ${backup_dir} ]
then
    mkdir -p ${backup_dir}
fi
tar zcf ${backup_dir}/${backup_file} /etc/ /var/spool/cron/

#3、md5校验
md5sum ${backup_dir}/${backup_file} > ${backup_dir}/print.md5

#3、推送
rsync -a  ${backup_dir}  rsync_backup@${backup_server}::backup --password-file=/etc/rsync.client

#4、清理
find $backup_dir -type f -name "*.tar.gz" -mtime +7 | xargs rm -f
3.2.2 服务端备份脚本
1、创建存放备份脚本目录
[root@harbor01 ~]# mkdir /scripts
2、编写服务端备份脚本
[root@harbor01 ~]# cat   /scripts/server_bak.sh
#!/bin/bash
#author: zq
#desc: 系统备份脚本
#version: v1.0

#0、变量
result_file=/scripts/result.txt

#1、清理旧的备份
find /backup -type f -name "*.tar.gz" -mtime +7 | xargs rm -f

#2、统计备份结果
find /backup -type f -name "*.tar.gz" | xargs ls -lhd | awk -F '[ /]+' 'BEGIN{print "IP地址","备份文件名字","大小"} {print $(NF-1),$NF,$5}' | column -t > ${result_file}

#3、MD5校验
echo "#下面信息为备份的MD5校验信息" >> ${result_file}
find /backup -name "print.md5" |   xargs md5sum -c >> ${result_file}

#4、发送邮件
mail -s "每日备份结果" 1904763431@qq.com <${result_file}
3.2.3 添加定时任务
1、客户端添加定时任务
[root@nfs01 ~]# crontab -e
00 01 * * * sh /scripts/client_bak.sh > /backup/result-`date +%F`.txt 2>&1
2、服务端添加定时任务
[root@nfs01 ~]# crontab -e
00 02 * * * sh /scripts/server_bak.sh > /backup/result-`date +%F`.txt 2>&1
3.2.4 结果验证
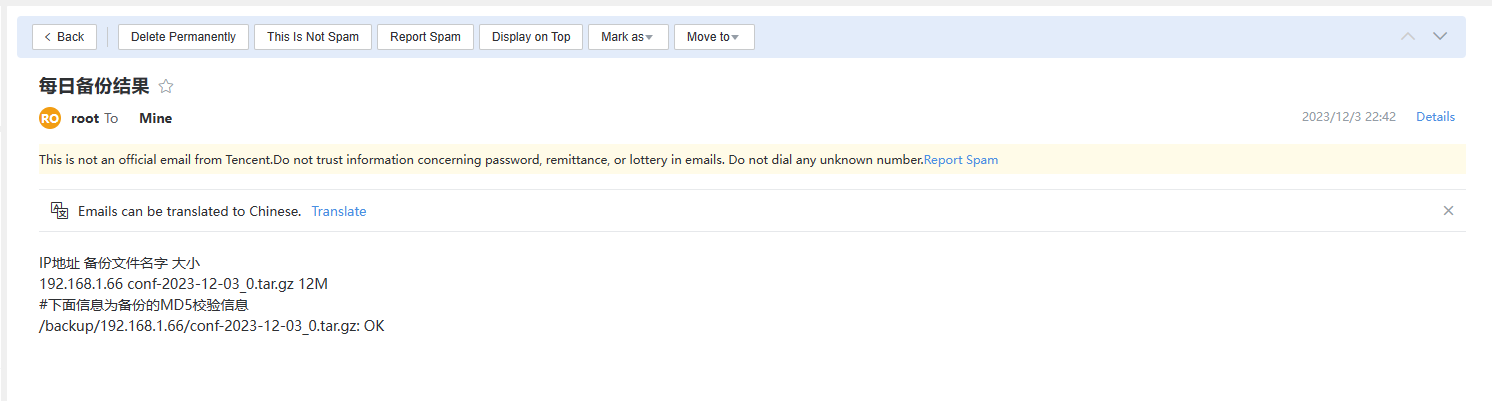
1、登录qq邮箱进行查看
2、登录服务端进行查看
[root@harbor01 ~]# cat  /scripts/result.txt
IP地址        备份文件名字              大小
192.168.1.66  conf-2023-12-03_0.tar.gz  12M
#下面信息为备份的MD5校验信息
/backup/192.168.1.66/conf-2023-12-03_0.tar.gz: OK