

一、基本环境配置
1.环境介绍
(1)高可用Kubernetes集群规划
| 主机名 | IP地址 | 说明 |
|---|---|---|
| master01 | 192.168.1.60/24 | master节点 |
| master02 | 192.168.1.63/24 | master节点 |
| master03 | 192.168.1.64/24 | master节点 |
| node01 | 192.168.1.61/24 | node节点 |
| node02 | 192.168.1.62/24 | node节点 |
| master-vip | 192.168.1.65/24 | keepalived虚拟IP |
(2)网段规划
| 网段名称 | 网段划分 |
|---|---|
| 宿主机网段 | 192.168.1.0/24 |
| Pod网段 | 172.16.0.0/12 |
| Service网段 | 10.0.0.0/16 |
(3)虚拟机规划
采用三Master两Node,4核4G+磁盘40G+40G
2.配置信息
| 配置信息 | 备注 |
|---|---|
| 系统版本 | Centos7.9 |
| Contained版本 | v1.6.24 |
| Kubeadm版本 | v1.26.9 |
[root@master01 ~]# cat /etc/redhat-release
CentOS Linux release 7.9.2009 (Core)

[root@master01 ~]# containerd --version
containerd containerd.io 1.6.24 61f9fd88f79f081d64d6fa3bb1a0dc71ec870523

[root@master01 ~]# kubeadm version
kubeadm version: &version.Info{Major:"1", Minor:"26", GitVersion:"v1.26.9", GitCommit:"d1483fdf7a0578c83523bc1e2212a606a44fd71d", GitTreeState:"clean", BuildDate:"2023-09-13T11:31:28Z", GoVersion:"go1.20.8", Compiler:"gc", Platform:"linux/amd64"}
注意事项:宿主机网段、K8s Service网段、Pod网段不能重复!!!
3.修改主机名
(1)根据规划信息在每台机器上修改主机名
$ hostnamectl set-hostname master01
$ hostnamectl set-hostname master02
$ hostnamectl set-hostname master03
$ hostnamectl set-hostname node01
$ hostnamectl set-hostname node02
4.修改host文件
(1)每台机器安装vim工具,如果安装过请忽略
$ yum install vim -y
(2)每台机器上修改hosts文件
$ vim /etc/hosts

192.168.1.60 master01
192.168.1.63 master02
192.168.1.64 master03
192.168.1.65 master-vip
192.168.1.61 node01
192.168.1.62 node02
注意事项:如果不是高可用集群,上面VIP为Master01的IP!!!
5.安装yum源
(1)在每台机器上执行以下命令配置默认yum源并安装依赖
$ curl -o /etc/yum.repos.d/CentOS-Base.repo https://mirrors.aliyun.com/repo/Centos-7.repo
$ yum install -y yum-utils device-mapper-persistent-data lvm2
(2)在每台机器上执行以下命令配置Docker的yum源
$ yum-config-manager --add-repo https://mirrors.aliyun.com/docker-ce/linux/centos/docker-ce.repo
(3)在每台机器上执行以下命令配置kubernetes的yum源
$ cat <<EOF > /etc/yum.repos.d/kubernetes.repo
[kubernetes]
name=Kubernetes
baseurl=https://mirrors.aliyun.com/kubernetes/yum/repos/kubernetes-el7-x86_64/
enabled=1
gpgcheck=0
repo_gpgcheck=0
gpgkey=https://mirrors.aliyun.com/kubernetes/yum/doc/yum-key.gpg https://mirrors.aliyun.com/kubernetes/yum/doc/rpm-package-key.gpg
EOF
$ sed -i -e '/mirrors.cloud.aliyuncs.com/d' -e '/mirrors.aliyuncs.com/d' /etc/yum.repos.d/CentOS-Base.repo
6.必备工具安装
(1)在每台机器上执行以下命令安装必备工具
$ yum install wget jq psmisc vim net-tools telnet yum-utils device-mapper-persistent-data lvm2 git -y
7.关闭防火墙、swap分区、dnsmasq、selinux
(1)在每台机器上执行以下命令关闭防火墙
$ systemctl disable --now firewalld
(2)在每台机器上执行以下命令关闭selinux
$ setenforce 0
$ sed -i 's#SELINUX=enforcing#SELINUX=disabled#g' /etc/sysconfig/selinux
$ sed -i 's#SELINUX=enforcing#SELINUX=disabled#g' /etc/selinux/config
(3)在每台机器上执行以下命令关闭dnsmasq
$ systemctl disable --now dnsmasq
Failed to execute operation: No such file or directory
注意:这里如果是通过VMware虚拟机实践的,会因为没有这个服务而报错!!!
(4)在每台机器上执行以下命令关闭NetworkManager
$ systemctl disable --now NetworkManager
注意:公有云不要关闭NetworkManager!!!
(5)在每台机器上执行以下命令关闭swap分区
#临时关闭
$ swapoff -a && sysctl -w vm.swappiness=0

#永久关闭
$ sed -ri '/^[^#]*swap/s@^@#@' /etc/fstab
8.时钟同步
(1)在每台机器上执行以下命令安装ntpdate
$ rpm -ivh http://mirrors.wlnmp.com/centos/wlnmp-release-centos.noarch.rpm
$ yum install ntpdate -y
(2)在每台机器上执行以下命令同步时间
$ ln -sf /usr/share/zoneinfo/Asia/Shanghai /etc/localtime
$ echo 'Asia/Shanghai' >/etc/timezone
$ ntpdate time2.aliyun.com

#添加定时任务
$ crontab -e
*/5 * * * * /usr/sbin/ntpdate time2.aliyun.com
9.配置limit
(1)在每台机器上执行以下命令配置limit
$ ulimit -SHn 65535

$ vim /etc/security/limits.conf
# 末尾添加以下内容
* soft nofile 65536
* hard nofile 131072
* soft nproc 65535
* hard nproc 655350
* soft memlock unlimited
* hard memlock unlimited
10.Master01节点配置免密钥登录
(1)在Master01节点上配置如下命令,使其免密钥登录其他节点
$ ssh-keygen -t rsa #按3次回车即可
$ for i in master01 master02 master03 node01 node02;do ssh-copy-id -i .ssh/id_rsa.pub $i;done
注意:此操作结束后会提示输入4次其他节点的密码!!!
(2)在Master01节点上远程登录node02节点进行测试,发现测试成功
$ ssh node02
11.下载源码文件
(1)在Master01节点上下载源码文件
$ git clone https://gitee.com/jeckjohn/k8s-ha-install.git
(2)在Master01节点上执行以下命令查看分支
$ cd k8s-ha-install
$ git branch -a

* master
  remotes/origin/HEAD -> origin/master
  remotes/origin/manual-installation
  remotes/origin/manual-installation-v1.16.x
  remotes/origin/manual-installation-v1.17.x
  remotes/origin/manual-installation-v1.18.x
  remotes/origin/manual-installation-v1.19.x
  remotes/origin/manual-installation-v1.20.x
  remotes/origin/manual-installation-v1.20.x-csi-hostpath
  remotes/origin/manual-installation-v1.21.x
  remotes/origin/manual-installation-v1.22.x
  remotes/origin/manual-installation-v1.23.x
  remotes/origin/manual-installation-v1.24.x
  remotes/origin/manual-installation-v1.25.x
  remotes/origin/manual-installation-v1.26.x
  remotes/origin/manual-installation-v1.27.x
  remotes/origin/manual-installation-v1.28.x
  remotes/origin/master
12.升级系统
(1)在每台机器上执行以下命令升级系统
$ yum update -y --exclude=kernel*
二、内核配置
Centos7默认内核为3.10
$ uname -a

Linux master01 3.10.0-1160.el7.x86_64 #1 SMP Mon Oct 19 16:18:59 UTC 2020 x86_64 x86_64 x86_64 GNU/Linux
1.内核升级
(1)在Master01节点下载内核
$ cd /root
$ wget http://193.49.22.109/elrepo/kernel/el7/x86_64/RPMS/kernel-ml-devel-4.19.12-1.el7.elrepo.x86_64.rpm
$ wget http://193.49.22.109/elrepo/kernel/el7/x86_64/RPMS/kernel-ml-4.19.12-1.el7.elrepo.x86_64.rpm
(2)从master01节点传到其他节点
$ for i in master02 master03 node01 node02;do scp kernel-ml-4.19.12-1.el7.elrepo.x86_64.rpm kernel-ml-devel-4.19.12-1.el7.elrepo.x86_64.rpm $i:/root/ ; done
(3)在每台机器上执行以下命令安装内核
$ cd /root && yum localinstall -y kernel-ml*
(4)在每台机器上执行以下命令更改内核启动顺序
$ grub2-set-default  0 && grub2-mkconfig -o /etc/grub2.cfg
$ grubby --args="user_namespace.enable=1" --update-kernel="$(grubby --default-kernel)"
(5)在每台机器上执行以下命令检查默认内核是不是4.19
$ grubby --default-kernel
/boot/vmlinuz-4.19.12-1.el7.elrepo.x86_64
(6)在每台机器上执行以下命令重启并检查默认内核是不是4.19
$ reboot
$ uname -a

Linux master02 4.19.12-1.el7.elrepo.x86_64 #1 SMP Fri Dec 21 11:06:36 EST 2018 x86_64 x86_64 x86_64 GNU/Linux
2.配置ipvs模块
(1)在每台机器上执行以下命令安装ipvsadm
$ yum install ipvsadm ipset sysstat conntrack libseccomp -y
(2)在每台机器上执行以下命令配置ipvs模块,在内核4.19+版本nf_conntrack_ipv4已经改为nf_conntrack, 4.18以下使用nf_conntrack_ipv4即可
modprobe -- ip_vs
modprobe -- ip_vs_rr
modprobe -- ip_vs_wrr
modprobe -- ip_vs_sh
modprobe -- nf_conntrack
(3)在每台机器上修改/etc/modules-load.d/ipvs.conf文件,在文件末尾添加以下内容
$ vim /etc/modules-load.d/ipvs.conf
ip_vs
ip_vs_lc
ip_vs_wlc
ip_vs_rr
ip_vs_wrr
ip_vs_lblc
ip_vs_lblcr
ip_vs_dh
ip_vs_sh
ip_vs_fo
ip_vs_nq
ip_vs_sed
ip_vs_ftp
ip_vs_sh
nf_conntrack
ip_tables
ip_set
xt_set
ipt_set
ipt_rpfilter
ipt_REJECT
ipip
(4)在每台机器上设置开机自启
$ systemctl enable --now systemd-modules-load.service
(5)在每台机器上执行以下命令开启一些k8s集群中必须的内核参数,所有节点配置k8s内核
```
$ cat <<EOF > /etc/sysctl.d/k8s.conf
net.ipv4.ip_forward = 1
net.bridge.bridge-nf-call-iptables = 1
net.bridge.bridge-nf-call-ip6tables = 1
fs.may_detach_mounts = 1
net.ipv4.conf.all.route_localnet = 1
vm.overcommit_memory=1
vm.panic_on_oom=0
fs.inotify.max_user_watches=89100
fs.file-max=52706963
fs.nr_open=52706963
net.netfilter.nf_conntrack_max=2310720

net.ipv4.tcp_keepalive_time = 600
net.ipv4.tcp_keepalive_probes = 3
net.ipv4.tcp_keepalive_intvl =15
net.ipv4.tcp_max_tw_buckets = 36000
net.ipv4.tcp_tw_reuse = 1
net.ipv4.tcp_max_orphans = 327680
net.ipv4.tcp_orphan_retries = 3
net.ipv4.tcp_syncookies = 1
net.ipv4.tcp_max_syn_backlog = 16384
net.ipv4.ip_conntrack_max = 65536
net.ipv4.tcp_max_syn_backlog = 16384
net.ipv4.tcp_timestamps = 0
net.core.somaxconn = 16384
EOF

#应用
$ sysctl --system
上面参数说明:
- net.ipv4.ip_forward:允许系统在网络接口之间转发IP数据包
- net.bridge.bridge-nf-call-iptables:启用iptables处理桥接的网络流量
- net.bridge.bridge-nf-call-ip6tables:启用ip6tables处理桥接的网络流量
- fs.may_detach_mounts:允许在使用时卸载文件系统
- net.ipv4.conf.all.route_localnet:允许本地源IP地址的数据包路由
- vm.overcommit_memory:控制内存分配的过度提交行为
- vm.panic_on_oom:控制当发生内存不足条件时内核崩溃的行为
- fs.inotify.max_user_watches:指定每个用户的最大inotify监视数
- fs.file-max:指定最大打开文件数
- fs.nr_open:指定可打开的文件句柄的最大数
- net.netfilter.nf_conntrack_max:指定最大跟踪连接数
- net.ipv4.tcp_keepalive_time:指定TCP keepalive探测之间的间隔时间
- net.ipv4.tcp_keepalive_probes:指定可以发送的TCP keepalive探测的数量
- net.ipv4.tcp_keepalive_intvl:指定TCP keepalive探测之间的间隔时间
- net.ipv4.tcp_max_tw_buckets:指定timewait套接字的最大数量
- net.ipv4.tcp_tw_reuse:控制timewait套接字是否可以被重用
- net.ipv4.tcp_max_orphans:指定最大孤立套接字数量
- net.ipv4.tcp_orphan_retries:指定孤立套接字的重试次数
- net.ipv4.tcp_syncookies:启用TCP syncookies以防止SYN洪泛攻击
- net.ipv4.tcp_max_syn_backlog:指定侦听队列的最大大小
- net.ipv4.ip_conntrack_max:指定最大跟踪连接数
- net.ipv4.tcp_max_syn_backlog:指定侦听队列的最大大小
- net.ipv4.tcp_timestamps:启用TCP时间戳以进行性能优化
- net.core.somaxconn:指定侦听队列中的最大连接数
(6)重启每台机器
$ reboot
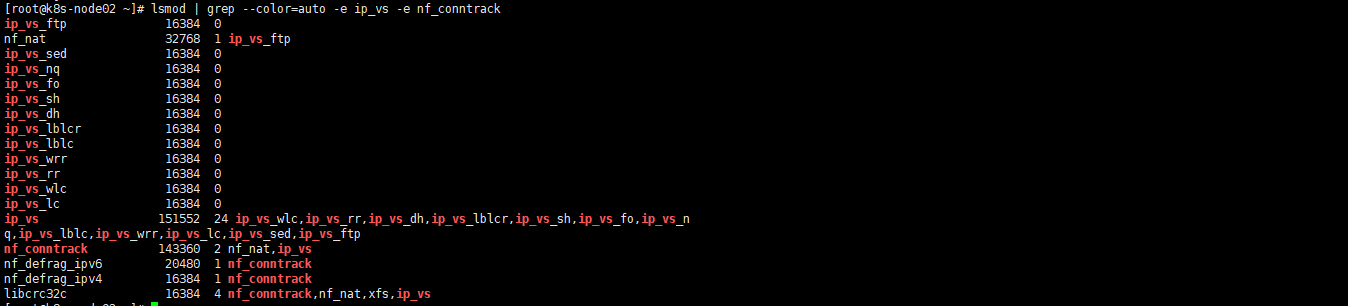
(7)在每台机器上执行以下命令进行验证,有"nf_conntrack"和"ip_vs"字样代表成功
$ lsmod | grep --color=auto -e ip_vs -e nf_conntrack
1.3 Containerd作为Runtime
如果安装的版本低于1.24,选择Docker和Containerd均可,高于1.24选择Containerd作为Runtime。
1.在每台机器上执行以下命令安装docker-ce-20.10,注意这里安装docker时会把Containerd也装上
$ yum install docker-ce-20.10.* docker-ce-cli-20.10.* -y
2.在每台机器上执行以下命令配置Containerd所需的模块
$ cat <<EOF | sudo tee /etc/modules-load.d/containerd.conf
overlay
br_netfilter
EOF
3.在每台机器上执行以下命令加载模块
modprobe -- overlay
modprobe -- br_netfilter
4.在每台机器上执行以下命令配置Containerd所需的内核
$ cat <<EOF | sudo tee /etc/sysctl.d/99-kubernetes-cri.conf
net.bridge.bridge-nf-call-iptables  = 1
net.ipv4.ip_forward                 = 1
net.bridge.bridge-nf-call-ip6tables = 1
EOF
5.在每台机器上执行以下命令加载内核
$ sysctl --system
6.在每台机器上执行以下命令配置Containerd的配置文件
$ mkdir -p /etc/containerd
$ containerd config default | tee /etc/containerd/config.toml
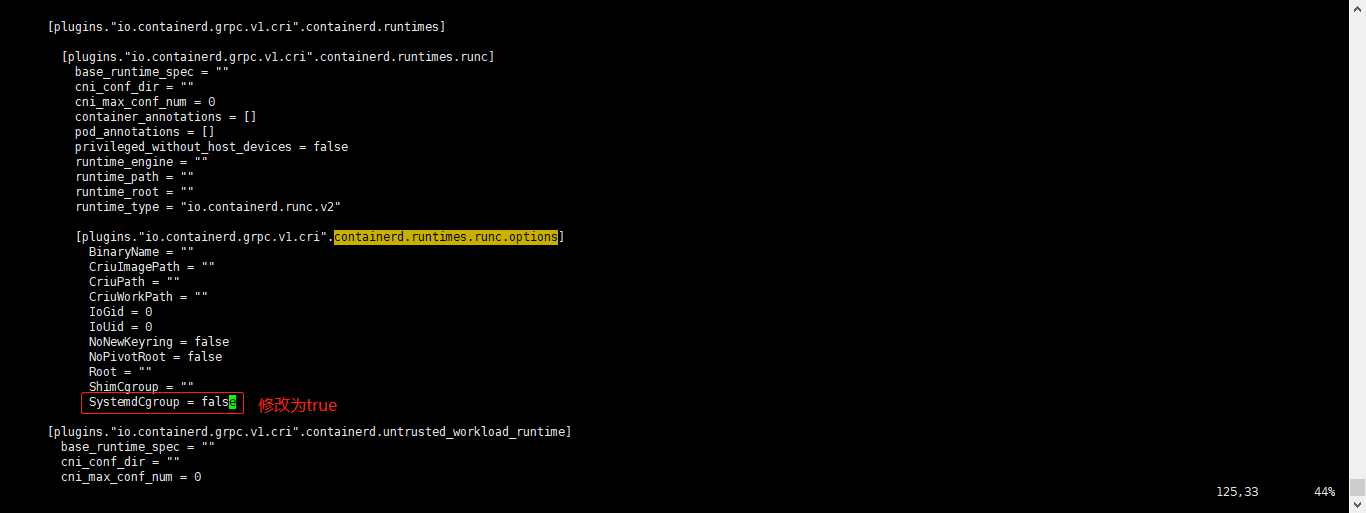
7.在每台机器上执行以下命令将Containerd的Cgroup改为Systemd,找到containerd.runtimes.runc.options,添加SystemdCgroup = true(如果已存在直接修改,否则会报错)
$ vim /etc/containerd/config.toml
...
...
[plugins."io.containerd.grpc.v1.cri".containerd.runtimes.runc.options]
  BinaryName = ""
  CriuImagePath = ""
  CriuPath = ""
  CriuWorkPath = ""
  IoGid = 0
  IoUid = 0
  NoNewKeyring = false
  NoPivotRoot = false
  Root = ""
  ShimCgroup = ""
  SystemdCgroup = true
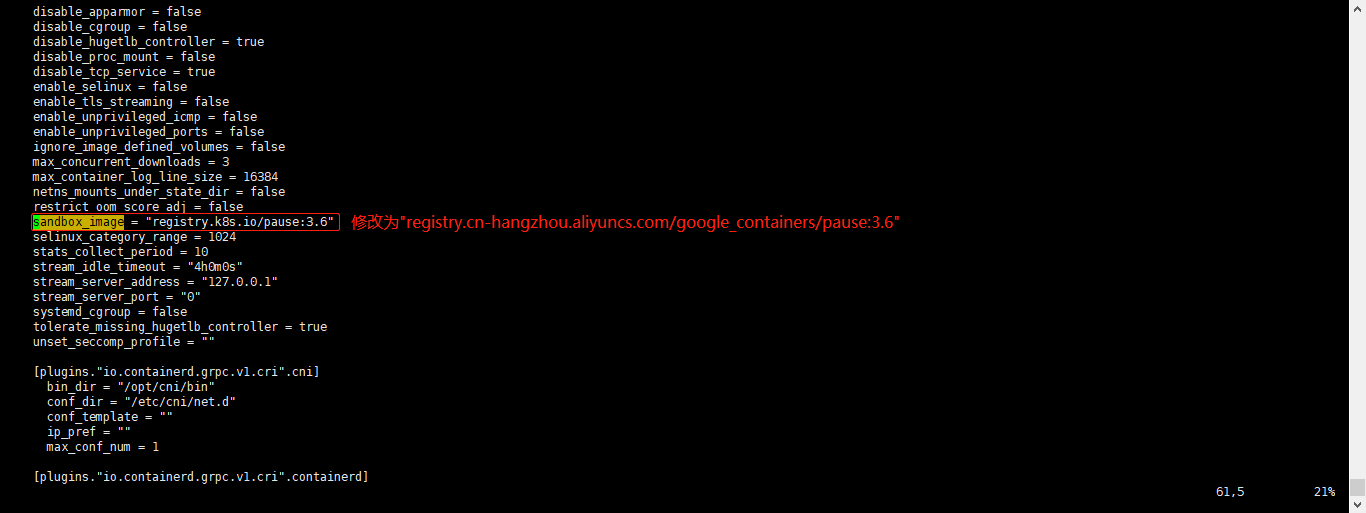
8.在每台机器上执行以下命令将sandbox_image的Pause镜像改成符合自己版本的地址registry.cn-hangzhou.aliyuncs.com/google_containers/pause:3.6
$ vim /etc/containerd/config.toml

#原本内容
sandbox_image = "registry.k8s.io/pause:3.6"
#修改后的内容
sandbox_image = "registry.cn-hangzhou.aliyuncs.com/google_containers/pause:3.6"
9.在每台机器上执行以下命令启动Containerd,并配置开机自启动
$ systemctl daemon-reload
$ systemctl enable --now containerd
$ ls /run/containerd/containerd.sock
/run/containerd/containerd.sock
10.在每台机器上执行以下命令配置crictl客户端连接的运行时位置
$ cat > /etc/crictl.yaml <<EOF
runtime-endpoint: unix:///run/containerd/containerd.sock
image-endpoint: unix:///run/containerd/containerd.sock
timeout: 10
debug: false
EOF
11.在每台机器上执行以下命令进行验证
$ ctr image ls
REF TYPE DIGEST SIZE PLATFORMS LABELS
1.4 安装Kubernetes组件Kubeadm&Kubelet
1.在Master01节点查看最新的Kubernetes版本是多少
$ yum list kubeadm.x86_64 --showduplicates | sort -r
2.在每台机器上执行以下命令安装1.26最新版本kubeadm、kubelet和kubectl
$ yum install kubeadm-1.26* kubelet-1.26* kubectl-1.26* -y

#查看版本
$ kubeadm version
3.在每台机器上执行以下命令更改Kubelet的配置使用Containerd作为Runtime,如果选择的是docker作为的Runtime,则不需要进行更改
$ cat >/etc/sysconfig/kubelet<<EOF
KUBELET_KUBEADM_ARGS="--container-runtime=remote --runtime-request-timeout=15m --container-runtime-endpoint=unix:///run/containerd/containerd.sock"
EOF
4.在每台机器上执行以下命令设置Kubelet开机自启动(由于还未初始化,没有kubelet的配置文件,此时kubelet无法启动,无需管理)
$ systemctl daemon-reload
$ systemctl enable --now kubelet

$ systemctl status kubelet
说明:由于还未初始化,没有kubelet的配置文件,此时kubelet无法启动,无需管理
1.5 高可用组件安装
公有云要用公有云自带的负载均衡,比如阿里云的SLB,腾讯云的ELB,用来替代haproxy和keepalived,因为公有云大部分都是不支持keepalived的,另外如果用阿里云的话,kubectl控制端不能放在master节点,推荐使用腾讯云,因为阿里云的slb有回环的问题,也就是slb代理的服务器不能反向访问SLB,但是腾讯云修复了这个问题。
注意:如果不是高可用集群,haproxy和keepalived无需安装!!!
1.安装HAProxy
(1)所有Master节点通过yum安装HAProxy和KeepAlived
$ yum install keepalived haproxy -y
(2)所有Master节点配置HAProxy,所有Master节点的HAProxy配置相同
$ mkdir /etc/haproxy
$ > /etc/haproxy/haproxy.cfg
$ vim /etc/haproxy/haproxy.cfg
global
 maxconn 2000
 ulimit-n 16384
 log 127.0.0.1 local0 err
 stats timeout 30s

defaults
 log global
 mode http
 option httplog
 timeout connect 5000
 timeout client 50000
 timeout server 50000
 timeout http-request 15s
 timeout http-keep-alive 15s

frontend monitor-in
 bind *:33305
 mode http
 option httplog
 monitor-uri /monitor

frontend k8s-master
 bind 0.0.0.0:16443
 bind 127.0.0.1:16443
 mode tcp
 option tcplog
 tcp-request inspect-delay 5s
 default_backend k8s-master

backend k8s-master
 mode tcp
 option tcplog
 option tcp-check
 balance roundrobin
 default-server inter 10s downinter 5s rise 2 fall 2 slowstart 60s maxconn 250 maxqueue 256 weight 100
 server master01 192.168.1.60:6443 check
 server master02 192.168.1.63:6443 check
 server master03 192.168.1.64:6443 check
(3)所有Master节点重启HAProxy,并验证端口16443
$ systemctl restart haproxy
$ netstat -lntp | grep 16443
tcp        0      0 127.0.0.1:16443         0.0.0.0:*               LISTEN      1075/haproxy
tcp        0      0 0.0.0.0:16443           0.0.0.0:*
2.安装KeepAlived
所有Master节点配置KeepAlived,配置不一样,注意区分每个节点的IP和网卡(interface参数)
(1)Master01节点的配置如下
$ mkdir /etc/keepalived
$ > /etc/keepalived/keepalived.conf
$ vim /etc/keepalived/keepalived.conf
! Configuration File for keepalived
global_defs {
    router_id LVS_DEVEL
    script_user root
    enable_script_security
}
vrrp_script chk_apiserver {
    script "/etc/keepalived/check_apiserver.sh"
    interval 5
    weight -5
    fall 2
    rise 1
}
vrrp_instance VI_1 {
    state MASTER
    interface ens33
    mcast_src_ip 192.168.1.60
    virtual_router_id 51
    priority 101
    advert_int 2
    authentication {
        auth_type PASS
        auth_pass K8SHA_KA_AUTH
    }
    virtual_ipaddress {
        192.168.1.65
    }
    track_script {
        chk_apiserver
    }
}
(2)Master02节点的配置如下
$ mkdir /etc/keepalived
$ > /etc/keepalived/keepalived.conf
$ vim /etc/keepalived/keepalived.conf
! Configuration File for keepalived
global_defs {
    router_id LVS_DEVEL
    script_user root
    enable_script_security
}
vrrp_script chk_apiserver {
    script "/etc/keepalived/check_apiserver.sh"
    interval 5
    weight -5
    fall 2
    rise 1
}
vrrp_instance VI_1 {
    state MASTER
    interface ens33
    mcast_src_ip 192.168.1.63
    virtual_router_id 51
    priority 100
    advert_int 2
    authentication {
        auth_type PASS
        auth_pass K8SHA_KA_AUTH
    }
    virtual_ipaddress {
        192.168.1.65
    }
    track_script {
        chk_apiserver
    }
}
(3)Master03节点的配置如下
$ mkdir /etc/keepalived
$ > /etc/keepalived/keepalived.conf
$ vim /etc/keepalived/keepalived.conf
! Configuration File for keepalived
global_defs {
    router_id LVS_DEVEL
    script_user root
    enable_script_security
}
vrrp_script chk_apiserver {
    script "/etc/keepalived/check_apiserver.sh"
    interval 5
    weight -5
    fall 2
    rise 1
}
vrrp_instance VI_1 {
    state MASTER
    interface ens33
    mcast_src_ip 192.168.1.64
    virtual_router_id 51
    priority 100
    advert_int 2
    authentication {
        auth_type PASS
        auth_pass K8SHA_KA_AUTH
    }
    virtual_ipaddress {
        192.168.1.65
    }
    track_script {
        chk_apiserver
    }
}
(4)所有master节点配置KeepAlived健康检查文件
$ vim /etc/keepalived/check_apiserver.sh
#!/bin/bash

#初始化错误计数器
err=0
#循环三次检查HAProxy进程是否在运行
for k in $(seq 1 3)
do
    check_code=$(pgrep haproxy)
    if [[ $check_code == "" ]]; then
        #如果未找到进程,增加错误计数器并等待一秒钟
        err=$(expr $err + 1)
        sleep 1
        continue
    else
        #如果找到进程,重置错误计数器并退出循环
        err=0
        break
    fi
done

#根据错误计数器的值,决定是否停止keepalived服务并退出脚本
if [[ $err != "0" ]]; then
    echo "systemctl stop keepalived"
    /usr/bin/systemctl stop keepalived
    exit 1
else
    exit 0
fi

#赋权
$ chmod +x /etc/keepalived/check_apiserver.sh
3.所有master节点启动haproxy和keepalived
$ systemctl daemon-reload
$ systemctl enable --now haproxy
$ systemctl enable --now keepalived
4.测试VIP,验证keepalived是否是正常
$ ping 192.168.1.65 -c 4