

一、构建工具集成
1.1 构建工具集成
1.2 集成Maven构建工具

1.2.1 安装maven
https://maven.apache.org/download.cgi
$  java -version
openjdk version "1.8.0_252"
OpenJDK Runtime Environment (build 1.8.0_252-b09)
OpenJDK 64-Bit Server VM (build 25.252-b09, mixed mode)

$ sudo yum install java-1.8.0-openjdk-devel
$ javac -version
javac 1.8.0_252
tar zxf apache-maven-3.6.3-bin.tar.gz -C /usr/local/

vim /etc/profile

#设置全局变量(/etc/profile)
export JAVA_HOME=/usr/local/jdk1.8.0_252
export M2_HOME = /usr/local/apache-maven-3.6.3
export PATH=$PATH:$JAVA_HOME/bin:$M2_HOME

source /etc/profile
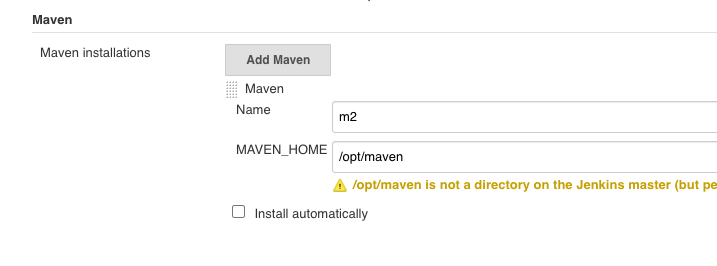
1.2.1 安装Maven on Centos
https://linuxize.com/post/how-to-install-apache-maven-on-centos-7/
wget https://www-us.apache.org/dist/maven/maven-3/3.6.3/binaries/apache-maven-3.6.3-bin.tar.gz -P /tmp
sudo tar xf /tmp/apache-maven-3.6.3-bin.tar.gz -C /opt
sudo ln -s /opt/apache-maven-3.6.3 /opt/maven
sudo vim /etc/profile.d/maven.sh

export JAVA_HOME=/usr/lib/jvm/jre-openjdk
export M2_HOME=/opt/maven
export MAVEN_HOME=/opt/maven
export PATH=${M2_HOME}/bin:${PATH}

sudo chmod +x /etc/profile.d/maven.sh

source /etc/profile.d/maven.sh

$ mvn -version
Apache Maven 3.6.3 (cecedd343002696d0abb50b32b541b8a6ba2883f)
Maven home: /opt/maven
Java version: 1.8.0_252, vendor: Oracle Corporation, runtime: /usr/lib/jvm/java-1.8.0-openjdk-1.8.0.252.b09-2.el7_8.x86_64/jre
Default locale: en_US, platform encoding: UTF-8
OS name: "linux", version: "3.10.0-957.12.2.el7.x86_64", arch: "amd64", family: "unix"

$ whereis mvn
mvn: /opt/apache-maven-3.6.3/bin/mvn.cmd /opt/apache-maven-3.6.3/bin/mvn
1.2.2 集成maven
-
常用命令
clean清理构建目录clean package打包clean install打包部署clean test单元测试- Jenkins 配置
maven
stage("Build"){
     mvnHome = "/opt/apache-maven-3.6.3/bin/mvn"
     sh "${mvnHome}/mvn clean package "
}
maven.jenkinsfile
#!groovy
pipeline {
    agent { node { label "hostmachine" }}
    stages{
        stage('tools') {
            steps {
                script {
                    mvnHome = tool "m2"
                    sh "${mvnHome}/bin/mvn --version"
                }
            }
        }
    }
 }
...
[Pipeline] tool
[Pipeline] sh
+ /opt/maven/bin/mvn --version
Apache Maven 3.6.3 (cecedd343002696d0abb50b32b541b8a6ba2883f)
Maven home: /opt/maven
Java version: 1.8.0_252, vendor: Oracle Corporation, runtime: /usr/lib/jvm/java-1.8.0-openjdk-1.8.0.252.b09-2.el7_8.x86_64/jre
Default locale: en_US, platform encoding: UTF-8
OS name: "linux", version: "3.10.0-957.12.2.el7.x86_64", arch: "amd64", family: "unix"
...
1.3 集成Ant构建工具
- https://ant.apache.org/bindownload.cgi
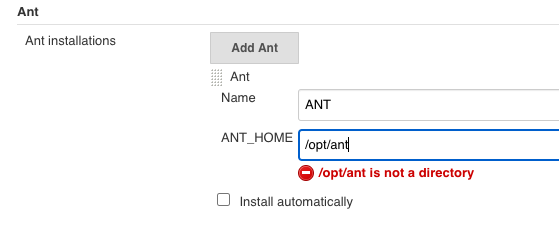
1.3.1 安装Ant
unzip apache-ant-1.9.15-bin.zip
sudo mv apache-ant-1.9.15 /opt/ant
sudo ln -s /opt/ant/bin/ant /usr/bin/ant

sudo vim /etc/profile.d/ant.sh

#!/bin/bash
ANT_HOME=/opt/ant
PATH=$ANT_HOME/bin:$PATH
export PATH ANT_HOME
export CLASSPATH=.

sudo  chmod +x /etc/profile.d/ant.sh
source /etc/profile.d/ant.sh
$ ant -version
Unable to locate tools.jar. Expected to find it in /usr/lib/jvm/java-1.8.0-openjdk-1.8.0.252.b09-2.el7_8.x86_64/lib/tools.jar
Apache Ant(TM) version 1.9.15 compiled on May 10 2020

$ echo $ANT_HOME
/opt/ant

$ /opt/ant/bin/ant -v
Unable to locate tools.jar. Expected to find it in /usr/lib/jvm/java-1.8.0-openjdk-1.8.0.252.b09-2.el7_8.x86_64/lib/tools.jar
Apache Ant(TM) version 1.9.15 compiled on May 10 2020
Trying the default build file: build.xml
Buildfile: build.xml does not exist!
Build failed
#!groovy
pipeline {
    agent { node { label "hostmachine" }}
    parameters {
        choice(name: 'buildShell', choices: '-v\nclean package\nclean install\nclean test', description: 'Please chose your env')
    }
    stages{
        stage('tools-mvn') {
            steps {
                script {
                    mvnHome = tool "m2"
                    sh "${mvnHome}/bin/mvn ${buildShell}"
                }
            }
        }

        stage('tools-ant') {
            steps {
                script {
                    antHome = tool "ANT"
                    sh "${antHome}/bin/ant ${buildShell}"
                }
            }
        }
    }
 }
1.3.2 Console Output
+ /opt/maven/bin/mvn -v
Apache Maven 3.6.3 (cecedd343002696d0abb50b32b541b8a6ba2883f)
Maven home: /opt/maven
Java version: 1.8.0_252, vendor: Oracle Corporation, runtime: /usr/lib/jvm/java-1.8.0-openjdk-1.8.0.252.b09-2.el7_8.x86_64/jre
Default locale: en_US, platform encoding: UTF-8
OS name: "linux", version: "3.10.0-957.12.2.el7.x86_64", arch: "amd64", family: "unix"
[Pipeline] }
...
+ /opt/ant/bin/ant -v
Unable to locate tools.jar. Expected to find it in /usr/lib/jvm/java-1.8.0-openjdk-1.8.0.252.b09-2.el7_8.x86_64/lib/tools.jar
Apache Ant(TM) version 1.9.15 compiled on May 10 2020
Trying the default build file: build.xml
Buildfile: build.xml does not exist!
Build failed
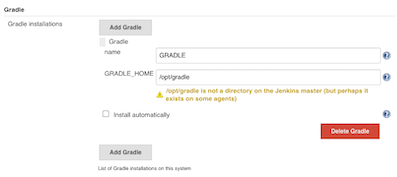
1.4 集成Gradle构建工具
- https://gradle.org/releases/
wget https://services.gradle.org/distributions/gradle-6.5-bin.zip
unzip gradle-6.5-bin.zip
sudo mv gradle-6.5 /opt/gradle

sudo ln -s /opt/gradle/bin/gradle /usr/bin/gradle

sudo vim /etc/profile.d/gradle.sh

#!/bin/bash
GRADLE_HOME=/opt/gradle
PATH=$GRADLE_HOME/bin:$PATH
export PATH GRADLE_HOME
export CLASSPATH=.

sudo  chmod +x /etc/profile.d/gradle.sh

source /etc/profile.d/gradle.sh
$ gradle -v

Welcome to Gradle 6.5!

Here are the highlights of this release:
 - Experimental file-system watching
 - Improved version ordering
 - New samples

For more details see https://docs.gradle.org/6.5/release-notes.html

------------------------------------------------------------
Gradle 6.5
------------------------------------------------------------

Build time:   2020-06-02 20:46:21 UTC
Revision:     a27f41e4ae5e8a41ab9b19f8dd6d86d7b384dad4

Kotlin:       1.3.72
Groovy:       2.5.11
Ant:          Apache Ant(TM) version 1.10.7 compiled on September 1 2019
JVM:          1.8.0_252 (Oracle Corporation 25.252-b09)
OS:           Linux 3.10.0-957.12.2.el7.x86_64 amd64

$ echo $GRADLE_HOME
/opt/gradle
1.4.1 Gradle测试
#!groovy
pipeline {
    agent { node { label "hostmachine" }}
    parameters {
        choice(name: 'buildShell', choices: '-v\nclean package\nclean install\nclean test', description: 'Please chose your env')
    }
    stages{
        stage('tools-mvn') {
            steps {
                script {
                    mvnHome = tool "m2"
                    sh "${mvnHome}/bin/mvn ${buildShell}"
                }
            }
        }

        stage('tools-ant') {
            steps {
                script {
                    try {
                        antHome = tool "ANT"
                        sh "${antHome}/bin/ant ${buildShell}"
                    } catch(e){
                        println(e)
                    }
                }
            }
        }

        stage('tools-gradle') {
            steps {
                script {
                    gradleHome = tool "GRADLE"
                    sh "${gradleHome}/bin/gradle ${buildShell}"
                }
            }
        }
    }
 }
1.4.2 Gradle常用命令
./gradle -v版本号,首次运行,没有gradle的要下载的哦。./gradle clean删除HelloWord/app目录下的build文件夹./gradle build检查依赖并编译打包./gradle assembleDebug编译并打Debug包./gradle assembleRelease编译并打Release的包./gradle installReleaseRelease模式打包并安装./gradle uninstallRelease卸载Release模式包
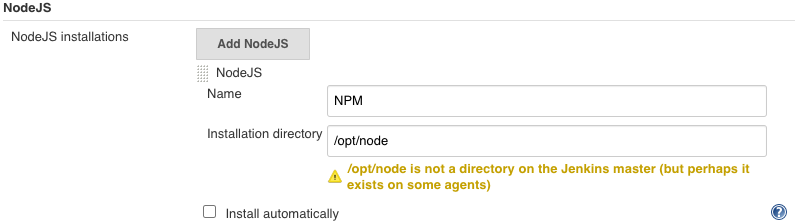
1.5 集成NPM构建工具
- https://nodejs.org/en/download/
1.5.1 安装Node
wget https://nodejs.org/dist/v12.18.1/node-v12.18.1-linux-x64.tar.xz
tar -xf node-v12.18.1-linux-x64.tar.xz
sudo mv node-v12.18.1-linux-x64 /opt/node
sudo ln -s /opt/node/bin/node /usr/bin/node

sudo vim /etc/profile.d/node.sh

#!/bin/bash
NODE_HOME=/opt/node
PATH=$NODE_HOME/bin:$PATH
export PATH NODE_HOME
export CLASSPATH=.

source /etc/profile.d/node.sh
$ node -v
v12.18.1
$ npm -v
6.14.5
echo $NODE_HOME
/opt/node
1.5.2 Node构建测试
#!groovy
pipeline {
    agent { node { label "hostmachine" }}
    parameters {
        choice(name: 'buildShell', choices: '-v\nclean package\nclean install\nclean test', description: 'Please chose your env')
    }
    stages{
        stage('tools-mvn') {
            steps {
                script {
                    mvnHome = tool "m2"
                    sh "${mvnHome}/bin/mvn ${buildShell}"
                }
            }
        }

        stage('tools-ant') {
            steps {
                script {
                    try {
                        antHome = tool "ANT"
                        sh "${antHome}/bin/ant ${buildShell}"
                    } catch(e){
                        println(e)
                    }
                }
            }
        }

        stage('tools-gradle') {
            steps {
                script {
                    gradleHome = tool "GRADLE"
                    sh "${gradleHome}/bin/gradle ${buildShell}"
                }
            }
        }

        stage('tools-npm') {
            steps {
                script {
                    npmHome = tool "NPM"
                    sh "${npmHome}/bin/npm ${buildShell}"
                    sh "${npmHome}/bin/node ${buildShell}"
                }
            }
        }
    }
 }
...
 + /opt/node/bin/npm -v
6.14.5
[Pipeline] sh
+ /opt/node/bin/node -v
v12.18.1
...
1.5.3 Npm常用构建命令
npm installnpm run build
1.6 使用共享库整合封装工具
1.6.1 Shared Library function
JenkinslibTest/src/org/devops/buildtools.groovy
package org.devops

// build tools
def Build(buildType, buildShell){
    def buildTools = ["mvn":"m2", "ant":"ANT","gradle":"GRADLE","npm":"NPM"]

    println("The current build tool is ${buildType}")
    buildHome = tool buildTools[buildType]

    sh "${buildHome}/bin/${buildType} ${buildShell}"
}
1.6.2 Pipeline function
#!groovy
@Library('jenkinslib@master') _
def build = new org.devops.buildtools()
pipeline {
agent { node { label "hostmachine" }}
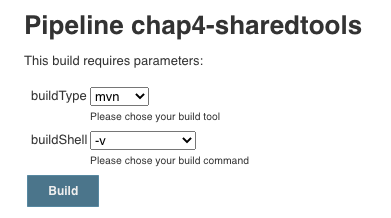
parameters {
choice(name: 'buildType', choices: 'mvn\nant\ngradle\nnpm', description: 'Please chose your build tool')
choice(name: 'buildShell', choices: '-v\nclean package\nclean install\nclean test', description: 'Please chose your build command')
}
stages{
stage('tools-mvn') {
steps {
script {
build.Build(buildType,buildShell)
}
}
}
}
}
...
The current build tool is mvn
[Pipeline] tool
[Pipeline] sh
+ /opt/maven/bin/mvn -v
Apache Maven 3.6.3 (cecedd343002696d0abb50b32b541b8a6ba2883f)
Maven home: /opt/maven
Java version: 1.8.0_252, vendor: Oracle Corporation, runtime: /usr/lib/jvm/java-1.8.0-openjdk-1.8.0.252.b09-2.el7_8.x86_64/jre
Default locale: en_US, platform encoding: UTF-8
OS name: "linux", version: "3.10.0-957.12.2.el7.x86_64", arch: "amd64", family: "unix"
...
二、集成SaltStack部署工具
2.1 安装saltstack
- https://repo.saltstack.com/index.html#rhel
2.1.1 centos7
$ sudo yum install https://repo.saltstack.com/py3/redhat/salt-py3-repo-latest.el7.noarch.rpm

$ sudo yum install salt-master
$ sudo yum install salt-minion

## 编辑/etc/salt/minion 文件填写对应的master地址
$ sudo vim /etc/salt/minion
master: 192.168.33.11

## 启动master 和 minion
$ sudo service salt-master start
$ sudo chkconfig salt-master on

$ sudo service salt-minion start
$ sudo chkconfig salt-minion on

#在master节点上认证客户端

$ sudo salt-key -L
Accepted Keys:
Denied Keys:
Unaccepted Keys:
jabox
Rejected Keys:

## salt-key -a clientName
$ sudo salt-key -a jabox
The following keys are going to be accepted:
Unaccepted Keys:
jabox
Proceed? [n/Y] y
Key for minion jabox accepted.

$ sudo salt "jabox" test.ping
jabox:
    True

$ sudo salt jabox cmd.run ls
jabox:
    anaconda-ks.cfg
    original-ks.cfg
2.2 集成saltstack
2.2.1 SharedLibrary
JenkinslibTest/src/org/devops/deploy.groovy
package org.devops

//salt stack

def SaltDeploy(host,func){
    sh "sudo salt ${host} ${func}"
}
2.2.2 Pipeline
#!groovy
@Library('jenkinslib@master') _

def build = new org.devops.buildtools()
def deploy = new org.devops.deploy()

pipeline {
    agent { node { label "hostmachine" }}
    parameters {
        choice(name: 'buildType', choices: 'mvn\nant\ngradle\nnpm', description: 'Please chose your build tool')
        choice(name: 'buildShell', choices: '-v\nclean package\nclean install\nclean test', description: 'Please chose your build command')
        choice(name: 'deployHosts', choices: 'jabox', description: 'Please chose your salt minion')
    }
    stages{
        stage('build-deploy') {
            steps {
                script {
                    build.Build(buildType,buildShell)

                    deploy.SaltDeploy("${deployHosts}","test.ping")
                    deploy.SaltDeploy("${deployHosts}","cmd.run ls")
                }
            }
        }
    }
 }
def deploy = new org.devops.deploy()deploy.SaltDeploy("${deployHosts}","test.ping")deploy.SaltDeploy("${deployHosts}","cmd.run ls")
2.2.3 Console Output
...
[Pipeline] sh
+ sudo salt jabox test.ping
jabox:
    True
[Pipeline] sh
+ sudo salt jabox cmd.run ls
jabox:
    anaconda-ks.cfg
    original-ks.cfg
...
Multiple Hosts Deploy
String deployHosts = "host1,host02"
stage("Deploy"){
    steps{
        script{
            hosts = deployHosts.split(",").toList()

            for (host in hosts){
                sh "salt ${host} cmd.run ls"
            }
        }
    }
}
三、Jenkins集成Ansibe实现自动化部署
3.1 Ansible介绍
Ansible采用了与Puppet , Chef不一样的解决方案,不需要在受控机器上安装额外的客户端软件。原因是Ansible使用的是SSH协议与受控机器进行通信的,一般服务器默认有SSH服务。 Ansible也因此被称为agentless(去客户端的)。
Ansible也不像Puppet、Chef那样需要在一台相对稳定的机器上安装一个主控程序,好让所有的受控机器连接上来。只要是安装了Ansible的机器就可以作为主控机器,比如工作时用的电脑.
Puppet和Chef都自己做了一套DSL,而Ansible使用YAML格式作为自己的DSL格式。
笔者认为这是非常聪明的设计一:
- 一是大家都熟悉YAML格式;
- 二是不需要自己设计DSL;
- 三是不用自己写编译器(
YAML可以直接映射到Python对象)。
Ansible将部署逻辑放在一个称为“playbook”的YAML文件中。通常,文件名是playbook.yml
---
- hosts: web
  tasks:
    — name: install nginx
      apt: name=nginx state=latest

    — hosts: db
      tasks:
        — name: install mysql
          yum: name={{item}}
          with_items:
            — 'mysql—common'
            — 'mysql—client'
            — 'mysql—server'
组织受控机器的逻辑被放在Inventory文件中。它是ini格式的默认文件名为hosts
[web]
192.168.33.10

[db]
192.168.33.11
只要运行
ansible-playbook --inventory hosts --user vagrant --ask-pass playbook, yml命令,输入SSH登录时用户vagrant的密码,就可以执行我们描述好的部署逻辑。为简单起见,我们是用户名和密码方式登录。
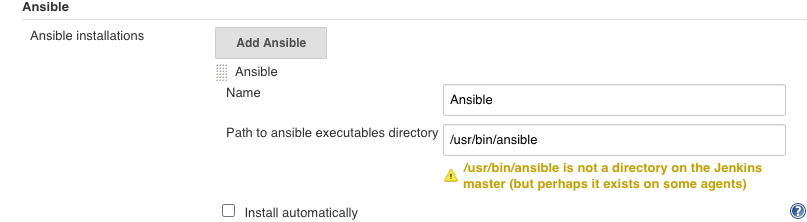
3.2 Ansible安装与集成
Jenkins与Ansible集成能让Jenkins执行ansible命令。
是具体步骤如下:
- (1)安装
Ansible插件 - (2)在主控机器上安装
Ansible井设置不进行host key检查。
sudo yum install epel-release
sudo yum -y install ansible
$ ansible --version
ansible 2.9.10
  config file = /etc/ansible/ansible.cfg
  configured module search path = [u'/home/vagrant/.ansible/plugins/modules', u'/usr/share/ansible/plugins/modules']
  ansible python module location = /usr/lib/python2.7/site-packages/ansible
  executable location = /usr/bin/ansible
  python version = 2.7.5 (default, Apr  9 2019, 14:30:50) [GCC 4.8.5 20150623 (Red Hat 4.8.5-36)]
主控机器指的是真正执行ansible命令的机器,也就是Jenkins。我们需要在主控机器上自行安装Ansible,然后修改主控机器的Ansible配置,不进行host key检查
cat /etc/ansible/ansible.cfg

[defaults]
host_key_checking = False
如果要求安全级别高,则应该提前将所有受控机器的fingerprint放到主控机器的knowhosts 文件中。
- (3)在
Jenkins上进人Manage Jenkins -> Global Tool Configuration-> Ansible配置页面配置Ansible的执行路径.
我们可以同时添加多个Ansible版本。请留意Name字段的滇后面介绍的ansiblePlaybook步骤会使用到。
- (4)在
Jenkins上添加登录受控机器的凭证。Ansible与受控机器连接的凭证需要我们在Jenkins手动添加。根据项目的实际清况可以选择使用用户名和密码的方式或者用户名和密钥的
3.2.1 简单集成ansible与SharedLibrary
cd /etc/ansible
sudo vim hosts

[jabox]
127.0.0.1 ansible_connection=local

ansible -m ping localhost
127.0.0.1 | SUCCESS => {
    "ansible_facts": {
        "discovered_interpreter_python": "/usr/bin/python"
    },
    "changed": false,
    "ping": "pong"
}
SharedLibrary
JenkinslibTest/src/org/devops/deploy.groovy
package org.devops

//salt stack

def SaltDeploy(host,func){
    sh "sudo salt ${host} ${func}"
}

def AnsibleDeploy(host,func){
    sh "ansible ${host} ${func}"
}
Pipeline
#!groovy
@Library('jenkinslib@master') _

def build = new org.devops.buildtools()
def deploy = new org.devops.deploy()

pipeline {
    agent { node { label "hostmachine" }}
    parameters {
        choice(name: 'buildType', choices: 'mvn\nant\ngradle\nnpm', description: 'Please chose your build tool')
        choice(name: 'buildShell', choices: '-v\nclean package\nclean install\nclean test', description: 'Please chose your build command')
        choice(name: 'deployHosts', choices: 'jabox', description: 'Please chose your salt minion')
    }
    stages{
        stage('build-deploy') {
            steps {
                script {
                    build.Build(buildType,buildShell)

                    deploy.SaltDeploy("${deployHosts}","test.ping")
                    deploy.AnsibleDeploy("${deployHosts}","-m ping")
                }
            }
        }
    }
 }
...
[Pipeline] tool
[Pipeline] sh
+ /opt/maven/bin/mvn -v
Apache Maven 3.6.3 (cecedd343002696d0abb50b32b541b8a6ba2883f)
Maven home: /opt/maven
Java version: 1.8.0_252, vendor: Oracle Corporation, runtime: /usr/lib/jvm/java-1.8.0-openjdk-1.8.0.252.b09-2.el7_8.x86_64/jre
Default locale: en_US, platform encoding: UTF-8
OS name: "linux", version: "3.10.0-957.12.2.el7.x86_64", arch: "amd64", family: "unix"
[Pipeline] sh
+ sudo salt jabox test.ping
jabox:
    True
[Pipeline] sh
+ ansible jabox -m ping
127.0.0.1 | SUCCESS => {
    "ansible_facts": {
        "discovered_interpreter_python": "/usr/bin/python"
    },
    "changed": false,
    "ping": "pong"
}
[Pipeline] }
[Pipeline] // script
[Pipeline] }
[Pipeline] // stage
[Pipeline] }
[Pipeline] // node
[Pipeline] End of Pipeline
Finished: SUCCESS
3.2.2 简单集成ansible playbook与Jenkins
部署目录如下
$ cd orkspace/workspace/chap4-ansible2
$ tree .

.
├── hosts
└── playbook.yml

0 directories, 2 files
playbook.yml
---
- hosts: localhost
  tasks:
    - debug: msg="{{ lookup('env','BUILD_TAG') }}"
hosts 文件
[localhost]
127.0.0.1 ansible_connection=local
Jenkinsfile内容如下
pipeline {
    agent { node { label "hostmachine" }}
    stages{
        stage('AnsibleDeploy') {
            steps {
                ansiblePlaybook(
                        playbook: "${env.WORKSPACE}/playbook.yml",
                        inventory: "${env.WORKSPACE}/hosts",
                    )
            }
        }
    }
 }
打印日志
Running on hostmachine in /home/vagrant/workspace/workspace/chap4-ansible2
[Pipeline] {
[Pipeline] stage
[Pipeline] { (AnsibleDeploy)
[Pipeline] ansiblePlaybook
[chap4-ansible2] $ ansible-playbook /home/vagrant/workspace/workspace/chap4-ansible2/playbook.yml -i /home/vagrant/workspace/workspace/chap4-ansible2/hosts

PLAY [localhost] ***************************************************************

TASK [Gathering Facts] *********************************************************
ok: [127.0.0.1]

TASK [debug] *******************************************************************
ok: [127.0.0.1] => {
    "msg": "jenkins-chap4-ansible2-9"
}

PLAY RECAP *********************************************************************
127.0.0.1                  : ok=2    changed=0    unreachable=0    failed=0    skipped=0    rescued=0    ignored=0
3.3 Ansible插件详解
3.3.1 ansibilePlaybook步骤
ansiblePlaybook步骤除支持 playbook,inventory, credetialsId三个参数外,还支持以下参数。
installation:字符串类型,值为前面设置的Name字段的值。用于指定不同版本的AnsiblevaultCredentialsld:Ansible vault密码在Jenkins中的凭证ID,它相当于--vault一password-file参数disabieHostKeychecking: 布尔类型,是否进行host key检查。become:布尔类型, 在执行操作时是否加上sudo,它相当于ansible命令行的--become参数。becorneUser: 字符串类型,切换到超级管理员用户名,默认是:root。它相当于ansible命令行的--become-user参数。limlt:字符串类型, 指定执行的主机。相当于ansible命令行的-l参数。多个主机之间使用逗号分隔tags:指定执行打上特定tag的任务。它相当于ansible命令行的-t参数。多个tag之间使用逗号分隔skippedTags参数。字符串类型, 指定跳过哪些tag的任务,它相当于ansible命令行的--skip-tags参数,多个tag之间使用逗号分隔。StartAtTask: 字符串类型, 从指定任务开始执行。它相当于ansible命令行的--start-at-task参数forks: 并行执行的进程数。相当干ansible命令行的-f参数extras: 字符串类型, 扩展参数。当ansiblePlaybook步骤的参数无法满足需求时,可以使用此参数,例如extras: '--syntax-check'extrasVars:List<org.jenkinsci.plugins.ansible.ExtraVar>类型,扩展变量。它相当于ansible命令行的-e参数, 格式如下
extraVars: [
    <key>: '<value>',
    <key>: [value: '<value>', hidden: true|false]
]
extraVars支持hidden属性,当其值为true时,在执行日志中会隐藏参数值。
我们来看一下完整的代码示例。
pipeline {
    agent any
    stages {
        stage('Syntax check ansible playbook'){
            steps {
                ansiblePlaybook(
                    disableHostKeyChecking: true,
                    playbook: "${env.WORKSPACE}/playbook.yml",
                    inventory: "${env.WORKSPACE}/hosts",
                    credentialsId: 'vagrant',
                    extras: '--syntax—check'
                )
            }
        }

        stage('Deploy') {
            steps {
                ansiblPlaybook(
                        disableHostKeyChecking: true,
                        playbook: "${env.WORKSPACE}/playbook.yml",
                        inventory: "${env.WORKSPACE}/hosts",
                        credentialsId: 'vagrant',
                        // skippedTags: 'debugtag'
                        forks: 2,
                        limit: 'example1,example',
                        tags: 'debugtag,testtag',
                        extraVars: [
                            login: 'mylogin'
                            secret_key: [value: 'g4fKkiEllpeF6pY05', hidden: true]
                        ]
                        // startAtTask: 'task4'
                    )
                }
            }
        }
    }
ansibleplaybook步骤只是Ansible插件提供的两个步骤中的一个还有ansibleVault步骤
3.3.2 ansibleVault步骤
放在配置文件中的MySQL连接密码想必是不希望如诉有人看见的。Ansible vault是Anaible 的一个特性,它能帮助我们加解密配置文件或者某个配置项
在ansiblePlaybook步骤中vaultCradentialsId参数的作用就是在ansible-playbook执行过程中,会对事先放在playbook中的密义进行解密解密需要密码vaultCradentialsId就是我们事先存储在Jenkins中的密码的凭证ID。
而ansibleVault步骤所做的事情就是执行Ansible提供的ansible-vault命令。该命令通常用于对敏感数据进行加解密。
ansibleVault支持以下参数。
-
action(必填:字符串类型,ansibleVault执行的操作类型。包括:encrypt加密文件 。encrypt_string加密字符rekey使用一个新的密码,进行加密但需要旧的密码ecceypt解密content:字符串类型, 加密文本时的字符串内容。
-
input:字符串类型追加到ansible-vault命令行后面的参数 installation:字符串类型与ansibilePlaybook步骤的installation参数的作用一样。newVaultCredentialsld:字符串类型, 使用新的凭证进行重新加密相当于ansible-vault命令的--new-vault-password-file参数output符串类型,追加到ansible-vault命令行后面的参数但是会放在input参数之前vaultCradentialsId(必填):字符串类型,密码的凭证lD。
接下来,我们看看ausible Vault应用场景的代码示例 。
对文本内容进行加密
ansibleVault(
    action: "encrypt_string",
    content: "${secret}",
    vaultCradentialsId: "vaultid",
)
对于content参数,也常通过参数化传入,而不是这样写的
- 加密文件
ansibleVault(
    action: "encrypt",
    vaultCredentialsId: "vaultid",
    input: "./vault--test.yml"
)
- 更换
vault密码
ansibleVault(
    action:"rekey",
    vaultCredentialsId:"vaultid",
    newVaultCredentialsId:"vaultid2",
    input: "./vault-test.yml"
)
- 解密文件
ansibleVault(
    action:"decrypt",
    vaultCredentialsId:"vaultid2",
    input: "./vault-test.yml"
)
四、Jenkins集成Ansibe实战手册 - BB Mobile(2018)
4.1 Description
Ansible setup functions and aws ec2 manipulation functions for Jenkins master and agents
4.2 Getting Started
install pip and pyenv[version:2.7.9]pip install ansible in pyenv- absoulte path:
/home/ubuntu/pyenv/versions/ansible/bin - check ansible version:
/home/ubuntu/pyenv/versions/ansible/bin/ansible --version
ansible 2.5.1
  config file = None
  configured module search path = [u'/home/ubuntu/.ansible/plugins/modules', u'/usr/share/ansible/plugins/modules']
  ansible python module location = /home/ubuntu/pyenv/versions/2.7.9/envs/ansible/lib/python2.7/site-packages/ansible
  executable location = /home/ubuntu/pyenv/versions/ansible/bin/ansible
  python version = 2.7.9 (default, Apr 28 2018, 06:18:59) [GCC 4.8.4]
- enter virtual env of ansible, you dont have use absolute path
source ~/pyenv/versions/ansible/bin/activate
- use ansible directly
4.3 Ansible files layout
ansible agent_playbook laying out roles, inventories ans playbooks
ansible-foobar/
├── cloud
│   ├── ec2.ini
│   ├── ec2.py
│   └── group_vars
├── roles
|   ├── ansible_playbook_name
|   |   |__ files --- files
|   |   |__ tasks --- main.yml
|   |   |__ templates --- tempalte
│   ├── base
|   |   |__ files --- jenkins_master_pub
|   |   |__ tasks --- main.yml
|   |   |__ templates --- 01-warning.j2
│   └── agents_name_for_setup
|   └── function_name_for_ec2
├── handlers
│   └── main.yml
├── localhost
├── site.yml
├── agent_name.yml
└── ec2_function.yaml
4.3.1 cloud/ec2.ini
[ec2]
## To exclude RDS instances from the inventory, uncomment and set to False.
rds = False
## To exclude ElastiCache instances from the inventory, uncomment and set to False.
elasticache = False
regions = us-east-1
destination_variable = private_dns_name
vpc_destination_variable = private_ip_address
4.4 Run the ansible playbook for setup
how to seup jenkins master and agent with ansible playbook
ansible-playbook -i cloud/ec2.py android_sdk_builder.yml -vvv
ansible-playbook -i cloud/ec2.py android_sdk_builder.yml
ansible-playbook -i cloud/ec2.py agents_name.yml
4.5 Run the ansible playbook for ec2 function
how to manipulate ec2 instance or instances with ansible playbook
/home/ubuntu/pyenv/versions/ansible/bin/ansible-playbook agents_playbook/ec2_ansible_function.yaml -i agents_playbook/localhost -t stop-one -e ONE_INSTNACE_NAME=instance_name -vvv
for example:
ansible-playbook agents_playbook/ec2_ansible_function.yaml -i agents_playbook/localhost -t tags_name -e additional variables as key=value -vvv
4.5.1 Reference
-
ansible playbook command line
https://docs.ansible.com/ansible/2.4/ansible-playbook.html -
ansible agent playbook layout
https://leucos.github.io/ansible-files-layout -
README-Template.md
https://gist.github.com/PurpleBooth/109311bb0361f32d87a2